A complete step-by-step guide to the German water bath canning procedure – for different jar types, with common beginner questions.
If you’re new to canning and looking for a clear, step-by-step guide to German water bath canning, this is the place to start. In this beginner-friendly tutorial, I walk you through my full canning procedure, based on traditional German methods and adapted from the real-life best practices shared by experienced home canners across Germany. This is the exact method I use for everything from fruit and tomato sauce to soups, vegetables, and even meat.
The guide is intentionally long and detailed – not because canning is difficult, but because it’s easy to get tripped up by small things when you’re starting out. I’ve included tips and explanations for common beginner questions so you can learn with confidence, not fear.
I’m Julie Kaiser, a molecular biologist who uses this exact procedure in my own kitchen on the German Lower Rhine to can hundreds of jars of food every year. I’ve spent years writing protocols and user guides for scientists in biology research and medical diagnostics, and I’ve approached this post the same way: as a clear, thoughtful procedure that helps you understand not just what to do, but why it matters.
Just starting out? Don’t forget to check out my German water bath canning overview.
German water bath canning protocol – step-by-step
Prepare your equipment and workspace
- Clean your workspace. I never start canning with a cluttered kitchen. Canning usually takes up more space than expected, so I like to make sure I have all the room I need and more.
- Get your equipment ready. For me, that means bringing up everything from the basement storage and setting up my electric canner outside on the covered terrace. I like to can outside, because it doesn’t heat up or steam up the house.
Not sure what canning gear you actually need? Here’s my canning equipment guide. - Take a minute to think ahead and determine whether you need to preheat your canning water. You don’t have to start heating it now, but pick the situation that applies to you and plan accordingly in case you need to preheat your water:
Situation 1: If you’re using a canner or pot with a rack, and…
…the food you’re canning is hot. You’ll need to add water to the canner and preheat it before putting the jars of food in. The water should be close to the jar/food temperature, not boiling. So plan to heat your water ahead of time.
…the food you’re canning is not hot. You have the option to add jars first or water first, as long as the water and the jars of food are all room temperature.
Situation 2: If you’re using a folded towel instead of a canning rack, and…
…the food you’re canning is hot. You’ll need to add water to the canner and preheat it before putting the jars of food in. The water should be close to the jar/food temperature, not boiling. So plan to heat your water ahead of time. Be aware that the towel may float up. If that happens – and especially if you’ll be canning more often – it’s worth getting a proper rack.
…the food you’re canning is not hot. Put the towel into the pot first, then the jars of food, and add your room temperature water last. Don’t add the water before the jars if you don’t have to (see above). - Check all jars, lids, and seals for chips or cracks. If it’s damaged, don’t use it.
- Clean all jars, lids, and seals with hot soapy water, rinse well, and let them drain. I put them upside down on a clean dish towel on my dish drainer. It’s not necessary to completely dry them.
Side note: Why do I wash my already clean jars? Because my basement is a bit damp and musty, and I’m certain there are mold spores on them. Boiling will probably kill those, but to me, it’s not worth putting all the time and effort in, if I’m starting with moldy jars (even though it’s not visible). You can also run them through the dishwasher, but if your dishwasher uses a rinse aid or water softener, this might leave an off taste in your canned food. - Boil the seals or lids. Whatever kinds of lids and jars you’re using, you’ll want to soak the seals or the part of the lid with the seal in boiling water for about 5 minutes before using them. I also put a bit of vinegar or citric acid in the water to make sure no mineral deposits remain. I put my seals in the boiling water, turn off the heat a couple of minutes later, and leave the lid on the pot until I’m ready to use them.
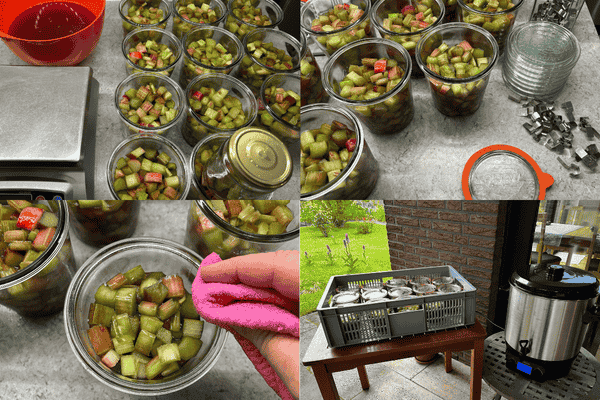
Prepare your food and fill the jars
- Prepare your food and fill jars. Read the points below before you start filling jars.
If your food is hot, your jars should be hot, too. Not boiling hot, but hot enough to avoid a sudden temperature shock and potential breakage.
Boil your food again if necessary. For foods like pureed soups and apple sauce, you must boil the food again after pureeing/blending and before putting into the jars. This lets the air bubbles in the food escape. If you don’t do this, the air bubbles will expand during processing and will push your food upwards and often through the seal. That creates a germ bridge that compromises the seals, because microbes will be able to get back into the jar, and the food will not be shelf stable.
Leave enough headspace (empty space) between the level of food and the top of the jar. If you don’t leave enough space, the food can leak out through the seal, forming a germ bridge that will allow microbes back into the jar. You’ll also be mad at yourself when this happens, trust me. Recommended space:
• 2–3 cm for chunky or solid foods
• 3–4 cm for liquids and purees like apple sauce
• 0–1 cm for soft fruits canned without additional juice (these will lose a lot of liquid during processing, and they will sink down into the jars) - Remove air from the jars. Use a clean table knife to gently remove air bubbles from the food. If you’re canning something like fruits or tomatoes without added liquid, just push the food down into the jars to remove most of the air. That air will expand and will push your food upward during processing, so the more you remove, the better.
- Wipe the jar rims clean, removing all traces of food.
- Close your jars according to the jar style:
Modern Weck jars: place the rubber seal onto the lid and then place that onto the jar. Close it by adding two clips opposite each other (for water bath canning). If you use more than two clips, the air will not be able to escape. Make sure the rubber seal is seated properly on the lid and the clips are in the correct position.
Twist-off jars: tighten the lid until the jar is closed, but don’t over-tighten it. This is NOT like the Mason-style jars where you only “finger tighten” them. That’s not tight enough, and your jars might not seal.
Mason-style jars with the two-piece lid/ring: just “finger tighten” the rings onto the lids. That means you’re not putting any wrist action into this movement, just the fingers.
Wire-bail jars: close the wire clamp.
Process the jars of food
- Place jars into your pot onto the canning rack (or folded towel if you’re improvising). It’s OK if the jars touch each other, but they shouldn’t be wedged in.
Remember: Warm jars/food go into warm water, and cool jars/food go into cool water. Refer back to step 3 for more details.
Note: Stacking jars is allowed. Modern Weck jars can be stacked directly on top of each other without another rack in between. However, if you have different sizes, types, and heights of jars or jars that don’t stack securely, it’s a good idea to put a wire rack on top of the bottom layer of jars and then place more jars on top of the rack. - Add water to the correct level. The water should cover the tops of the jars. If you’re stacking jars, there might not be enough space to cover the top layer of jars. In this case, the water level must come up to at least ¾ of the height of the top jars.
- Heat to the target temperature. The electric canner takes as long as it takes to heat up. I just set the temperature and timer and go do something else. However, if I’m canning on my induction cooktop, I avoid cranking the heat all the way up. Instead, I bring the water to a boil gradually over medium-high heat. That extra time matters – it lets the food inside the jars warm through, not just the water around them.
- Boil for the correct amount of time. Start timing only after the water reaches your target temperature (usually 100°C).
Note: For long boils, I do check a couple of times to make sure I still have enough water in the canner and that the temperature is correct. I know by now that I don’t lose much water over 2 hours, but I do look at the thermostat and make sure the water is actually boiling if it’s meant to be. It doesn’t need to boil vigorously, but gently. In fact, vigorous boiling can lead to your food boiling over and siphoning out of the jars.
Boiling can destroy Clostridium botulinum spores, but only if you do it long enough. Read more in The boiling point myth – why you don’t need a pressure canner to kill Clostridium botulinum spores. - Carefully remove the jars and place in a single layer on a towel or wooden board. Let them cool undisturbed. No cold surfaces or drafts, no stacking, no moving for 24 hours.
Note: There’s a lot of different schools of thought about when to remove the jars. Some say immediately; others say anywhere from 5–10 minutes after the time is up and the heat has been turned off. I’m in that “others” category, and I wait 5 minutes for the temperature to go down a bit before removing the jars. They are hot, and when you remove them, the contents of the jars will often start bubbling. It’s normal. I place my jars into a big plastic Euro container on a layer of towels. Then I carefully put that inside my house to cool. The towels are to protect my floors in case anything breaks – it hasn’t yet.
Important: Don’t let your jars stay in the canning water for a long time or cool down in the water overnight. It increases the risk of spoilage – I’ll explain why in another post. - After 24 hours, check the seal. For WECK jars, two-piece Mason style jars, or wire bail jars: remove the clips, rings, or clamps – the lid should stay put when you lift the jar by the lid. For twist-off jars: the lid should be slightly concave and not pop when pressed.
- Store the jars in a cool dark place. Check them regularly to make sure they are still sealed and that there are no signs of spoilage.
What makes this method safe isn’t one step – it’s cumulative; I explain it in Seven layers of safety.
Never invert hot jars after canning.
Turning jars upside down pushes food under the lid as they cool, contaminating the sealing surface and creating weak or false seals. Let jars cool upright and undisturbed for 24 hours, then check the seal. Store without clamps, rings, or wire bails.
For a comprehensive guide, check out What you need to know about German water bath canning.
Frequently asked questions
Siphoning is the loss of liquid from the jar during or after processing. It’s usually a process issue (not contamination by itself), but residue on the rim can weaken the seal.
If the seal is solid and the rim stayed clean, it’s typically shelf-stable (quality may suffer). If the rim is dirty/greasy or the jar is not sealed, reprocess within 24 hours with a clean lid and seal or refrigerate and consume within a few days.
Carefully remove the jars from the canner and set them upright on a towel with a bit of spaced in between. Make sure they are not in a cold, drafty area, and leave them alone for 12–24 hours. Then check the seal.
No. Inverting the jars pushes food into the sealing surface and can result in false or weak seals.
The rubber tab will usually point downwards (but not always) and the lid will stay put when you gently lift it without the clamps. For my guide on canning with Weck jars, along with tips and tricks for proper lid placement and ensuring a good seal, check out this post.
Within 24 hours of canning, you can wipe the rims, replace the seals and lids, and re-process for the full time. Or you can refrigerate and eat the food within a few days.
Loss of vacuum after storage is a clear failure sign. You must discard it without tasting.
Worried you’ll miss something and get botulism? Here’s a clear guide to what actually causes it and how we prevent it. There was a case in Germany a few years ago where a lady had some jars of home canned beans lose their vacuum seals. She took the beans out of the jars and froze them and later ate them in an uncooked salad. She and her husband became seriously ill from botulism. (1, 2) Freezing doesn’t destroy botulinum toxin, and serving the beans without heating them to a boil kept the toxin active.
Siphoning happens when liquid is forced out of jars during or after processing. It’s usually caused by rapid pressure or temperature changes – from removing jars too quickly, boiling too hard, or exposing jars to drafts while cooling. It can also result from incorrect headspace or trapped air bubbles.
Leaving hardware on can hide a failed seal. Without clips or rings, a failure shows immediately, because the lid comes loose.
You can usually reuse the rubber rings a few times. Inspect them carefully and replace rings that are stretched, nicked, cracked, or smell of old food. For reprocessing jars that didn’t seal, always use a fresh ring.
References
- Hellmich D, Wartenberg KE, Zierz S, Mueller TJ. Foodborne botulism due to ingestion of home-canned green beans: Two case reports. J Med Case Rep. 2018;12(1). doi:10.1186/s13256-017-1523-9
- Botulismus: Ehepaar durch grüne Bohnen vergiftet. March 12, 2018. Accessed May 21, 2025. https://web.de/magazine/gesundheit/botulismus-ehepaar-gruene-bohnen-vergiftet-32862646

Julie Kaiser is a molecular biologist and science writer who has lived in Germany since 2011. She spent over a decade in virology and national security research labs before becoming a professional science writer. She came to German water bath canning the way scientists come to most things: by reading the primary sources and deciding the evidence held up. Old World Preserves is where she writes about what she’s learned and what she’s growing, cooking, and preserving in her Lower Rhine garden.